Tuesday 26 November 2013

C#.NET - Optional Parameters

Optional Parameters:

Optional Parameters are introduced in C# 4.0 
A parameter is optional if it specifies a default value in its declaration.

Observe GetPerson method in the following class. In this method we are specifying pAddress and pSalary as optional arguments.

C#.NET


class Person
    {
        public string Name { get; set; }
        public string Address { get; set; }
        public decimal Salary { get; set; }

        public static Person GetPerson(string pName, string pAddress = "None Specified", decimal pSalary = 10000)
        {
            return new Person()
            {
                Name = pName,
                Address = pAddress,
                Salary = pSalary
            };
        }

    }

Whenever you call the GetPerson method without passing values to optional arguments (pAddress and pSalary) parameters will take the default values specified in the method declaration.

Observe the following 3 steps how we are calling GetPerson method using optional parameters

Step: 1
When you supply all parameters to GetPerson method it will give the person object with supplied values as follows.

C#.NET


Step: 2
When you supply only person name and address parameters to GetPerson method it will assign the person name and address with the values you supplied and salary(10000) will be assign to the default value.

C#.NET


Step 3:
When you supply only person name to GetPerson method it will assign the person name with the value you supplied and address (Hyderabad) and salary(10000) will be assign to the default values.

C#.NET

Sunday 24 November 2013

C#.NET - How to add commas to Currency

Code:

static void Main(string[] args)
        {
            var numbers = new int[] {1, 10, 100, 1000, 10000, 100000, 10000000};
            foreach (var number in numbers)
            {
                Console.WriteLine(number.ToString("#,##0"));
            }
        }
Output:


Monday 11 November 2013

C#.NET - Object and Collection Initializers


Object and Collection Initializers are introduced in C# 3.0. These are very convenient fast and most readable. 

Observe the following Employee Class

public class Employee
{
    public string Name { get; set; }
    public string Designation { get; set; }
    public int Salary { get; set; }
}

Object Initializers

---------------------------
We can assign values to accessible fields and properties of an object at the time of object creation without having to explicitly invoking a constructor.

Creating an Employee type object

Employee emp1 = new Employee();
emp1.Name = "Srinu";
emp1.Designation = "Software Engineer";
emp1.Salary = 20000;
By using the Object initialisers we can create the same object in a single expression as follows. It is very simple and most readable.
Employee emp1 = new Employee()
{
    Name = "Srinu",
    Designation = "Software Engineer",
    Salary = 20000
};

Collection Initializers

--------------------------------
Collection Initializers are similar to the Object initializers.

Generally we will add the objects to the collection by using the Add method.
List<Employee> employees = new List<Employee>();

employees.Add(new Employee() { Name = "Srinu", Designation = "Software Engineer", Salary = 20000 });
employees.Add(new Employee() { Name = "Ramakee", Designation = "Sr. Software Engineer", Salary = 30000 });
employees.Add(new Employee() { Name = "Gajendra", Designation = "SEO", Salary = 10000 });
But collection initializers add objects to the collection directly at the time of creation of Collection.
List<Employee> employees = new List<Employee>()
        {
            new Employee() {Name = "Srinu", Designation = "Software Engineer", Salary = 20000},
            new Employee() {Name = "Ramakee", Designation = "Sr. Software Engineer", Salary = 30000},
            new Employee() {Name = "Gajendra", Designation = "SEO", Salary = 10000}
        };
Note:
To be able to use a Collection Initializer on an object, the object must satisfy these two requirements:
1. It must implement IEnumarable Interface.
2. Must have public Add() method.

Friday 8 November 2013

How to install DotNetNuke 7 on Windows 7 (Step by step user guide with pictures)

In this tutorial i will show you how to install DotNetnuke 7 on Windows 7 step by step with the pictures.

Step 1:
Go to http://www.dnnsoftware.com/ website to download the DotNetNuke7 and click on Download link.

Step 2:
Scroll down the page and download the INSTALL PACKAGE.

Step 3:
Open the downloaded ZIP file and Right Click and extract files to folder.
Step 4:
Your files will be extracted to the folder.
Step 5:
Open extracted folder.
Step 6:
Select and Copy all files in that folder.
Step 7:
Go to C:\inetpub directory and create a new folder named with DNN7.
Step 8:
Open IIS and select Default Website.
Step 9:
Right click on Default Website and select Add Virtual Directory.
Step 10:
Enter alias name as DNN6 and then enter the physical path C:\inetpub\DNN7 (DNN7 folder in C drive) . Click on OK button. Observe virtual directory will be added under the Default Website with the name DNN7.
Step 11: 
Right click on DNN7 Virtual Directory and click on Convert to Application. Your virtual directory will be converted into website.
Step 12:
Check the Application pool.
Your website application pool should be run under .NET 4.0 or above version observe the application pool of your website.
Right click on DNN7 website and click Manage Application and then click on Advanced Settings.
See Application pool of your website. Here your website application pool is DefaultApplicationPool
Now go to application pools and check version of DefaultApplicationPool
Change the version of the DefaultApplicationPool to .NET framework 4.0*** or above and click on OK button.
Step 13:
Your website is ready now.

Step 14:
Set up the database for your website as follows.

Open SQL Server
Create a new database with the name DNN7.
Step 14:
Give security permissions to the DNN7 folder in inetpub.
Go to C:\inetpub directory Right click on DNN7 folder and click on properties.
Step 15:
Select Security tab and click on Edit button.
Step 16:
For all Groups or User names give the full permissions and click on Apply button.
Step 17:
Open IIS.
Right click on DNN7 website and click on Manage Application and click on Browse.
Step 18:
You will get the DotNetNuke installation page. You should provide all the information.
Step 19:
In the Administration Information block give the password for the Super User (host) account.

Step 20:
In the website information give the name what you like. You can select the Default template or blank template and select the language for your website.
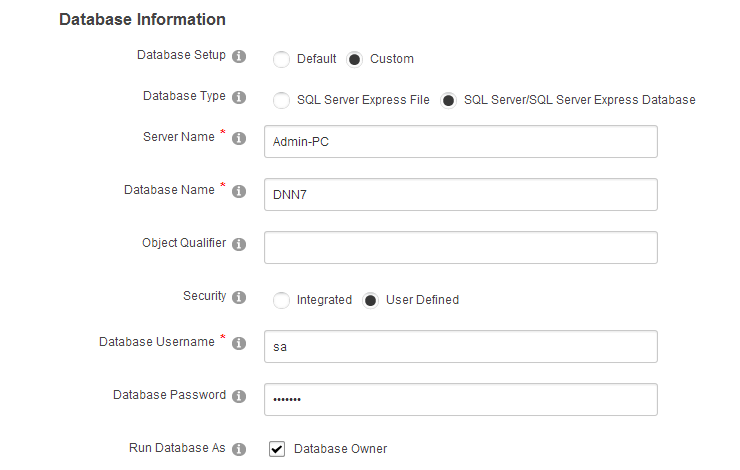
Step 21:
Select the Custom Database setup.
Select the database type as SQL Server/SQL Express Database.
Enter your SQL Server name.
Enter the database name.
Select Security as User Defined.
Enter your SQL Server Username.
Enter your SQL Server Password.
Check Run Database as Database owner check box.

Step 22:
After entered all the information click on Continue button.
You will be redirected to the installation page.
After completion of the installation of your DotNetNuke Visit Website button will be enabled for you.
Step 23:
Now Click on Visit Website button.
Step 24:
Now you you will be redirect to the your DotNetNuke website.