In this tutorial i will show you how to install DotNetnuke 7 on Windows 7 step by step with the pictures.
Step 1:
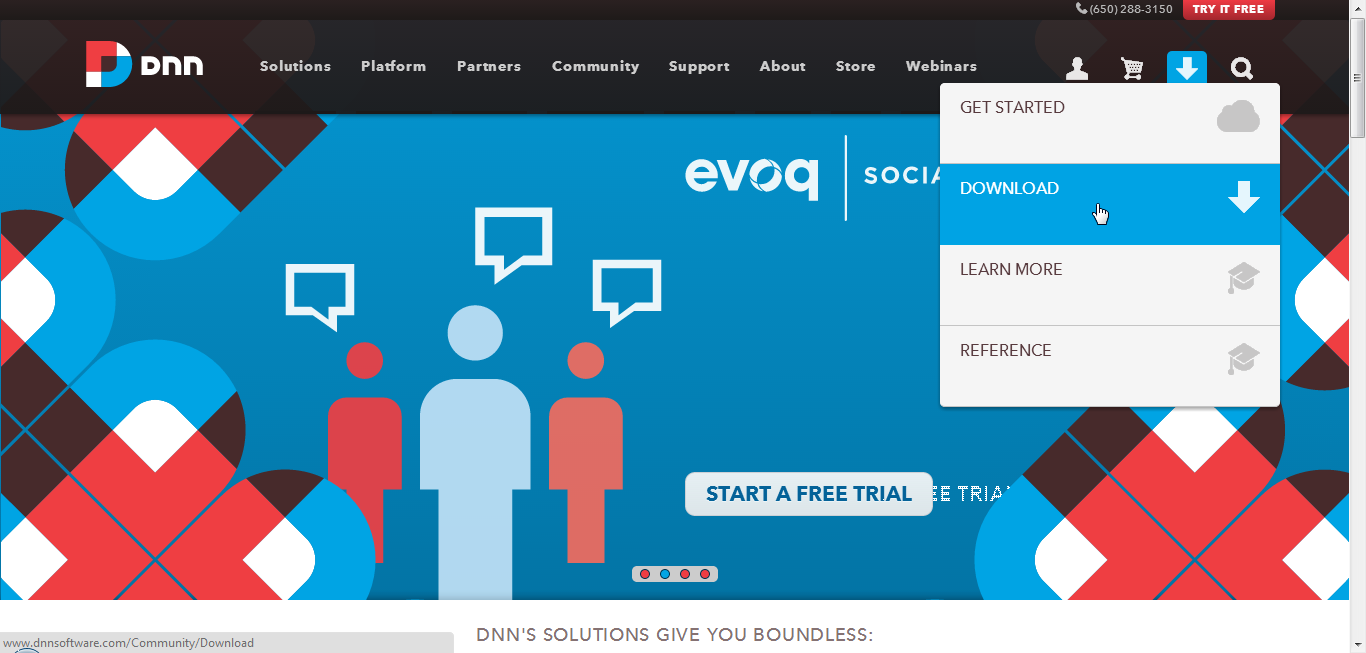
Go to http://www.dnnsoftware.com/ website to download the DotNetNuke7 and click on Download link.
Step 2:
Scroll down the page and download the INSTALL PACKAGE.

Step 3:
Open the downloaded ZIP file and Right Click and extract files to folder.
 Step 4:
Your files will be extracted to the folder.
 Step 5:
Open extracted folder.
 Step 6:
Select and Copy all files in that folder.
 Step 7:
Go to C:\inetpub directory and create a new folder named with DNN7.
 Step 8:
Open IIS and select Default Website.
 Step 9:
Right click on Default Website and select Add Virtual Directory.
 Step 10:
Enter alias name as DNN6 and then enter the physical path C:\inetpub\DNN7 (DNN7 folder in C drive) . Click on OK button. Observe virtual directory will be added under the Default Website with the name DNN7.
 Step 11:
Right click on DNN7 Virtual Directory and click on Convert to Application. Your virtual directory will be converted into website.
 Step 12:
Check the Application pool.
Your website application pool should be run under .NET 4.0 or above version observe the application pool of your website.
Right click on DNN7 website and click Manage Application and then click on Advanced Settings.
 See Application pool of your website. Here your website application pool is DefaultApplicationPool
 Now go to application pools and check version of DefaultApplicationPool.
 Change the version of the DefaultApplicationPool to .NET framework 4.0*** or above and click on OK button.
 Step 13:
Your website is ready now.
Step 14:
Set up the database for your website as follows.
Open SQL Server
 Create a new database with the name DNN7.
 Step 14:
Give security permissions to the DNN7 folder in inetpub.
Go to C:\inetpub directory Right click on DNN7 folder and click on properties.
 Step 15:
Select Security tab and click on Edit button.
 Step 16:
For all Groups or User names give the full permissions and click on Apply button.
 Step 17:
Open IIS.
Right click on DNN7 website and click on Manage Application and click on Browse.
 Step 18:
You will get the DotNetNuke installation page. You should provide all the information.
 Step 19:
In the Administration Information block give the password for the Super User (host) account.

Step 20:
In the website information give the name what you like. You can select the Default template or blank template and select the language for your website.
 Step 21:
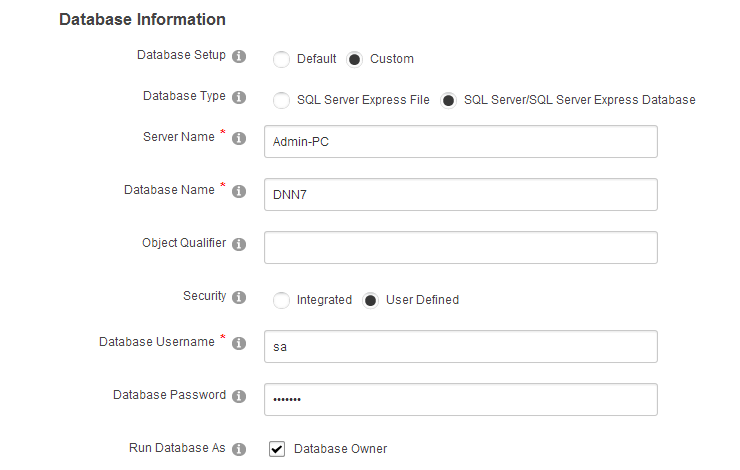
Select the Custom Database setup.
Select the database type as SQL Server/SQL Express Database.
Enter your SQL Server name.
Enter the database name.
Select Security as User Defined.
Enter your SQL Server Username.
Enter your SQL Server Password.
Check Run Database as Database owner check box.
Step 22:
After entered all the information click on Continue button.
You will be redirected to the installation page.
After completion of the installation of your DotNetNuke Visit Website button will be enabled for you.
 Step 23:
Now Click on Visit Website button.
 Step 24:
Now you you will be redirect to the your DotNetNuke website.

Step 1:
Go to http://www.dnnsoftware.com/ website to download the DotNetNuke7 and click on Download link.
Step 2:
Scroll down the page and download the INSTALL PACKAGE.
Step 3:
Open the downloaded ZIP file and Right Click and extract files to folder.
Your files will be extracted to the folder.
Open extracted folder.
Select and Copy all files in that folder.
Go to C:\inetpub directory and create a new folder named with DNN7.
Open IIS and select Default Website.
Right click on Default Website and select Add Virtual Directory.
Enter alias name as DNN6 and then enter the physical path C:\inetpub\DNN7 (DNN7 folder in C drive) . Click on OK button. Observe virtual directory will be added under the Default Website with the name DNN7.
Right click on DNN7 Virtual Directory and click on Convert to Application. Your virtual directory will be converted into website.
Check the Application pool.
Your website application pool should be run under .NET 4.0 or above version observe the application pool of your website.
Right click on DNN7 website and click Manage Application and then click on Advanced Settings.
Your website is ready now.
Step 14:
Set up the database for your website as follows.
Open SQL Server
Give security permissions to the DNN7 folder in inetpub.
Go to C:\inetpub directory Right click on DNN7 folder and click on properties.
Select Security tab and click on Edit button.
For all Groups or User names give the full permissions and click on Apply button.
Open IIS.
Right click on DNN7 website and click on Manage Application and click on Browse.
You will get the DotNetNuke installation page. You should provide all the information.
In the Administration Information block give the password for the Super User (host) account.
Step 20:
In the website information give the name what you like. You can select the Default template or blank template and select the language for your website.
Select the Custom Database setup.
Select the database type as SQL Server/SQL Express Database.
Enter your SQL Server name.
Enter the database name.
Select Security as User Defined.
Enter your SQL Server Username.
Enter your SQL Server Password.
Check Run Database as Database owner check box.
Step 22:
After entered all the information click on Continue button.
You will be redirected to the installation page.
After completion of the installation of your DotNetNuke Visit Website button will be enabled for you.
Now Click on Visit Website button.
Now you you will be redirect to the your DotNetNuke website.
No comments:
Post a Comment